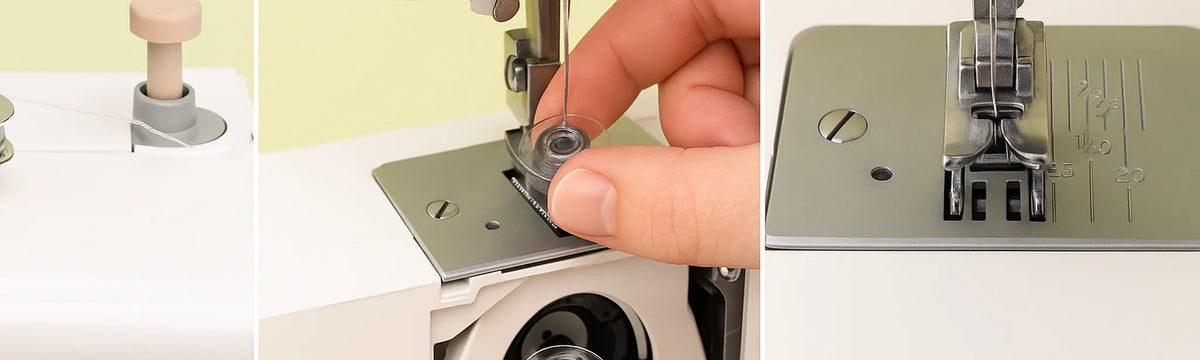
Loading a bobbin
Loading a Bobbin: A Complete Guide

The first time I tried to wind a bobbin, it was like watching a confused hamster spin in circles. Thread everywhere. Machine making weird noises. But once you understand the basics, winding and loading a bobbin becomes second nature—and it’s a skill every sewist must master. Let’s break it down clearly so you can bobbin like a pro!
Understanding Your Bobbin

First things first: not all bobbins are created equal. They come in metal or plastic versions, and they are machine-specific. Using the wrong bobbin for your machine is like trying to wear two left shoes—it won't work properly and can even damage your sewing machine. Always check your manual to confirm which bobbin your model needs.
Winding the Bobbin

- Wrap the thread around the bobbin winder thread guide, following your machine’s instructions (usually clockwise).
- Guide the thread to the bobbin, wrapping it two to three times by hand.
- Pull the thread through the slit at the base if required.
- Push the bobbin winder to the right (or engage the lever) until it clicks into place.
- Press the foot pedal gently to start winding. Let it fill up smoothly but don't overfill—it should stop automatically or you can manually stop it once full.
Pro tip: Always start with an empty bobbin. Winding over half-used bobbins creates uneven tension—trust me, your future self will thank you.
Loading a Top-Loading Bobbin

- Remove the bobbin cover plate.
- Insert the bobbin into the case, ensuring the thread unwinds correctly (follow the guide—usually counterclockwise).
- Pull the thread through the slit and under the tension spring.
- Slide the thread along the indicated path and pull toward the small cutter, trimming excess thread.
- Replace the bobbin cover, and you're ready to sew!
Loading a Front-Loading Bobbin

- Place the bobbin into the bobbin case, following the correct unwind direction.
- Pull the thread back into the slot and under the tension spring.
- Hold the small lever to secure the bobbin in the case.
- Insert the bobbin case into the machine until it clicks securely into place.
Loading a front-loading bobbin can feel fiddly at first, but with a little practice, it becomes second nature. One tip: always listen for that satisfying click when the case locks into position!
Exploring the Needle Plate

The needle plate (also called the throat plate) has measurement markings to help you sew precise seams. The most common seam allowance is 5/8 inch (1.5 cm)—perfect for garments. The raised lines in front of the presser foot and feed dogs (those tiny teeth under the fabric) help guide you straight, even if you're just starting out.
Final Thoughts
Winding and loading your bobbin properly might seem like small steps, but they are absolutely crucial to successful sewing. Every even stitch, every beautiful seam, starts here. Take the time to practice—and soon, it’ll feel like second nature, just another part of the creative magic you bring to life with your machine.