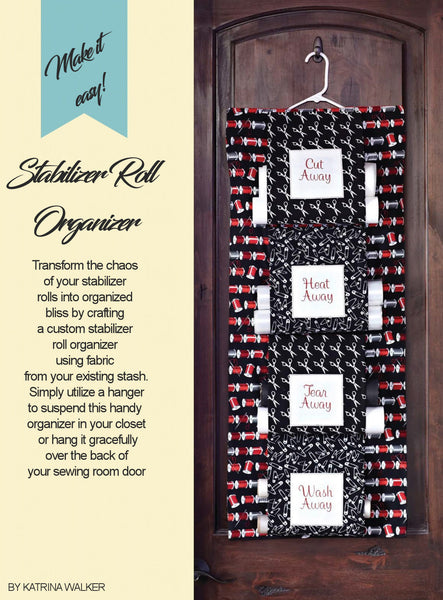
Sew a personalized stabilizer organizer
MATERIALS
- 2 fat quarters each of two solid cotton fabrics (A & B)
- 4 fat quarters of printed cotton fabric (C)
- 1⁄2 yard each of two cotton fabrics (D & E)
- Cut-away stabilizer
- 1⁄2 yard of lightweight fusible interfacing
- Fusible web strips
- Thread: bobbin & embroidery
- Removable fabric marker
- Built-in letter embroidery designs
PREPARE
- From fabric A, cut four squares large enough to fit within the hoop.
- From fabric B, cut one 9"x36" rectangle.
- From fabric C, cut eight 10"x18" rectangles.
- From each D and E fabric, cut one rectangle that measures 18"x the fabric width.
EMBROIDER
- Hoop one fabric A square with a piece of cut-away stabilizer. Using built-in letters on the machine, combine letters to form various stabilizer types, such as “Cut Away,” “Heat Away,” “Tear Away” and “Wash Away.” Make each letter no taller than 1".
- Thread the machine. Load the desired words into the machine. Place the hoop on the machine and embroider the words along the square center.
- Once the embroidery is complete, remove the hoop from the machine and the fabric from the hoop. Clip any jump threads. Trim the stabilizer to a 5" square, centered behind the design. Trim the fabric to a 6" square.
- Fold the excess fabric toward the square wrong side, mitering the corners. Use fusible web strips to fuse the fabric edges to the stabilizer, following the manufacturer’s instructions.
- Repeat to embroider the remaining stabilizer types on the remaining fabric A squares to create the pocket labels.
CONSTRUCT
Use ¼” seam allowances unless otherwise noted.

- Position two fabric C rectangles right sides together; pin, and then stitch one short edge and both long edges. Turn the rectangle to the right side; press. Designate the open edge as the lower edge. Repeat to stitch the remaining rectangles to create four pockets.
- Center one pocket label 4" below one pocket upper edge; pin, and then top-stitch the label perimeter (A). Repeat to stitch the remaining pocket labels to the remaining pockets.
- Position the fabric D rectangle right side down on a flat work surface. Position fusible interfacing over the rectangle wrong side; fuse, following the manufacturer’s instructions.
- Turn the fabric D rectangle right side up. Designate one short edge as the organizer upper edge. Using a removable fabric marker, mark 7 ¹⁄2" below the upper edge. Repeat to mark the rectangle three additional times, marking 9 ¹⁄2" below each previous mark (B).

Instructions
With the right side up, center one pocket rectangle lower edge along the first mark; pin, and then stitch ¹⁄2" from the raw edge (C). Turn the pocket wrong side up; pin, and then stitch ³⁄2" from the fold, concealing the raw edge (D).
Position the pocket rectangle upper edge 2" from the organizer upper edge; pin, and then topstitch.
Center a second pocket rectangle lower edge along the second mark; pin, and then stitch as for the first pocket rectangle. Position the pocket rectangle upper edge 4¹⁄2" below the first pocket lower edge; pin, and then topstitch. Repeat to stitch the remaining pockets. Set aside.
Fold the fabric B rectangle in half widthwise with right sides together to create a 9"x18" hanger holder. Designate the long raw edge as the upper edge. Using a removable fabric marker, mark the upper-edge center.
Draw a 5"-diameter semi-circle at the mark; cut out the semi-circle. Stitch the long raw edge, including along the semi-circle curve. Clip the curve, and then turn the holder to the right side.
Position the fabric E rectangle right side up on a flat work surface. Designate one short edge as the upper edge. Align the holder upper edge with the fabric E rectangle upper edge; pin, and then baste the holder short edges and upper edge, leaving the semi-circle free.
With right sides together, align the fabric D and fabric E rectangles; pin, and then stitch the sides and upper edge, using ¹⁄2" seam allowances along the sides and a ¹⁄2" seam allowance along the upper edge. Turn the organizer right side out; press. Fold the lower raw edges ¹⁄2" toward the wrong side; pin, and then topstitch, enclosing the raw edge.