Step-by-Step Guide: How to Embroider a Design on a Beanie

Download the Snowflake Wonderland: Embroidery Design Pack
Required Materials:
- Beanies and clothing items
- Self-adhesive sticky stabilizer
- Water-soluble topper
- Embroidery frame designed for delicate fabrics
- Snowflake embroidery patterns (consult 'SNOWFLAKE Designs' )
Pro Tip:
When embroidering on items like beanies and garments made of delicate, stretchy fabric, opt for a smaller design with fewer stitches. If you prefer not to purchase a specialized tool, you can fashion a wire coat hanger into the appropriate shape to assist with embroidering.
Preparation:
- Mark the desired design placement on the beanie or garment using a fabric marker.
- For the garment, ensure it's properly oriented before securing it in the embroidery frame suitable for delicate fabrics.
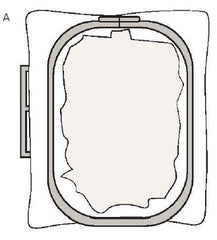
Place a section of self-adhesive sticky stabilizer within the embroidery hoop, ensuring that the shiny side faces upward. Gently create a crease along the top layer of the stabilizer, running it along the interior edge of the hoop (A).
 |
 |
EMBROIDERY PROCESS:
- Float the sock frame or toque on the sticky stabilizer and ensure it adheres
securely.
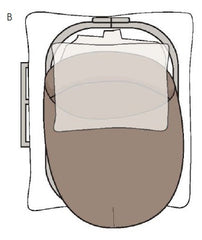
- Add a layer of water-soluble stabilizer over the embroidery area (B).
EMBROIDERY STEPS:
- Download the design and load it onto the embroidery machine.
- Begin stitching the design, making color changes as necessary.
- Once embroidery is complete, remove the hoop from the machine and carefully release the project from the hoop.
- Gently remove the stabilizer and water-soluble topper from the embroidered project. Rinse under cold water if any topper residue remains.
Download the Snowf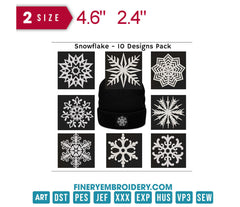 lake Wonderland: Embroidery Design Pack